pages

Tuesday, June 30, 2015

What's in The Box Giveaway!

I had a birthday in April and my dad gave me a blank check. Seriously! It's a tradition that we have. He gives me a blank check and says: "it will come out of your inheritance" Being the good daughter that I am I have never abused that and I always buy something for myself that is not too expensive.

This time I decided to treat myself to some craft supplies. So it took awhile for the stuff to get to me, because I had someone bring it to me instead of sending it in the mail. The box is filled with all kinds of goodies and I want you to guess what's in there!


Here are a few things to consider:
* Think about what I love to create (you can check my blogs posts and my YouTube channel)
* Think about the materials I love to use
* Think about what can fit in a medium flat rate box
* Think about the fact that someone had to bring it to me and carry it. Would I ask someone to do that if the supplies are too big or heavy?

Clues:
* There are different types of supplies
* I bought them online in 3 different stores

I think that's enough information...

You need to guess what's in the box!
The more right answers you have the greater chance you have to win because you get more entries!
You can guess as many times you want.
You have to share this in social media. For every friend you tag you get additional entry!

You will win a surprise goodie bag that will be filled with crafty goodness. And you know from previous giveaways that my goodie bags are always generously full with amazing products! The winner will be announced on July 24th.

Have fun creating!

Sunday, June 28, 2015

Wall of Inspiration: Mixed Media Canvas - Grow

Experimenting is one of the best things in mixed media. It's fun to try new materials, new techniques and new combinations. in this new small canvaS for my wall of inspiration I tries a new technique with hot  glue. Yes...that hot glue that you use for gluing things down. Apparently it can be a really great material to add texture to a canvas or an art journal page.


I used some aquarelle pencils and gelatos to add layers of color to my canvas. I added lots of texture with modeling paste and the hot glue art I created. I used a low temp hot glue gun which was much easier on my fingers. I don't know why but I always manage to get my fingers burned when I'm using a hot glue gun, so this one was great.


This is a great technique to try on an art journal page too, but remember to gesso your page first. And make sure everything is dry before you close your journal. Hot glue tend to be sticky sometimes, especially after using a heat tool around it.


What materials and techniques did you experiment with? Check out the video to find out how my experiments turned out!

Have fun creating!

Friday, June 26, 2015

4th of July Party Decoration with Ann Butler

4th of July is almost here and you're probably planning a BBQ, a picnic or a party. Instead of buying expensive decoration why not use papers and stencils to create everything you need to decorate your festivities!


I used Ann Butler's Stars Art Screen to create a white stars' pattern on red and blue papers. I used a white Posca pen, but you can also use white acrylic paint or modeling paste. To create a blue or red pattern on white paper the best thing to use are acrylic paints.


Once your pattern is ready you can create all your decorations. Here are just a few samples and ideas. You can find many more ideas online.


I creates a banner, cupcake toppers, bottle or glass wrapper, mini flags, a rosette and tags. You can customize any decoration by making it larger or smaller, use different papers and create different patterns with the same stencil. This is also a great activity for your kids.


How do you decorate your 4th of July party?

Don't miss out! Keep up with all the crafty goodness by subscribing to the Einat Kessler creative newsletter

Have fun creating!


Tuesday, June 23, 2015

Ready, Get set, De-stash! Paper Embellishments Tutorial

As you probably already know my resolution for this year is to use my stash and try not to buy so much supplies. it's already the middle of the year and i don't think I've done that enough. So today we're DE-STASHING!
We all have scraps of paper that are cut, have holes in them, are either too big or too small. We don't throw them away because we are sure we're going to use them. Well...today is the day! Take out all your scraps and join me!


First pick out papers that are in the same style and/or colors. I wanted a steampunk look so I've used brown, dark colors with script and numbers patterns.


Cut or punch shapes like circles, squares, stars, hearts or any other shape you want. I limited myself to 2" to 3" size but you can cut larger shapes. Then cut or punch smaller shapes from the papers and even cut out patterns. i cut out a few keys from a pattern paper piece that I had in my stash. Create combinations with all your shapes. Start with the larger shapes as the base and then layer the smaller shapes on them and create clusters. Finally add words or letters, but only if you have a partialy used sticker sheet! We're de-stashing remember?


Now you have your own paper embellishments to use in your projects, cards, scrapbook layouts or canvases. if they are big enough you can use them as cards, placement cards or even add a magnet on the back and put on your fridge.

Don't miss out! Keep up with all the crafty goodness by subscribing to the Einat Kessler creative newsletter

Have fun creating!

Sunday, June 21, 2015

3,2,1 Recipe - Mixed Media Layout

I was So happy you liked the last video in this series and even happier that you asked me to do more! So here's another recipe for a mixed media layout using 3 ingredients:
3 Techniques for adding paper flowers on a layout
2 Stencils
1 Acrylic medium


The purpose of these layouts is to show that you don;t have to use a lot of materials or fancy embellishments to create a beautiful layout. Sometimes we lose sight of what's important and that is NOT the embellishments it is the photo, the story we're telling! Everything around it is there to support the photo and the story. After all that's why we're scrappin' right?

3 Techniques
These are not new techniques, but it's a good reminder to how paper is versatile and how much you can create from it. Of course there are more techniques out there, but I think these are the easiest and fastest.


2 Stencils
Stencils are a great way to add dimension, texture, versatility and interest to a layout. It can be a part of the background, an embellishment, title or texture. You can pair it with many materials such as paint, ink, sprays and more. When you use more than one stencil I recommend using two different shapes but complementing shapes in terms of theme, size or mood.


1 Acrylic Medium
I love gesso! It is one of the most versatile acrylic mediums around. In this layout I used it in four different ways: As a modeling paste for creating a pattern with a stencil, a paint to add color to the butterflies, an accent on the chipboard letters and an ink to frame the edges of the page.


How many "ingredients" do you use on a layout? Do you tend to overload your pages? Try this recipe, challenge yourself to simplify, to downsize and to utilize your supplies.

Don't miss out! Keep up with all the crafty goodness by subscribing to the Einat Kessler creative newsletter

Have fun creating!

Friday, June 19, 2015

Making a Family History Book Part 5

Welcome to the final part of the series. I can now update you that the heritage book I created won first place! So I guess they liked my ideas for an interesting original design...I hope you do to. I have a few more ideas to share...

Make it Your Own

Sometimes you have an idea but you don't have the right supplies. I wanted to create doors, as an interactive mechanism to present the text in this page. However, I've already used a mechanism like that on another page so I didn't want to repeat myself. I decided to use a paper that looks like a door and not just two paper flaps. The problem was I didn't have the right size of paper. the solution was to scan the pattern into my computer and enlarge it to the size I need. Then I added them to my layout and inserted the text under them.


Layering

One of the best ways to create an interesting page is to layer different paper and embellishments with the same theme. In this page I had to create a page about the immigration routes of the family. So instead of just adding a map and text I layered a travel themed paper as a background and added a sign as the legend.


Quotes

I love using quotes. They're a great way to add more layer of content to the text. It is also a solution when you have a short text or want to keep the page simple without too many embellishments. I used many quotes all throughout the book. You can find quotes on many websites just search the subject you want with the word quote for example: "family quotes".


Get Artistic

Sometimes the best way to add something extra to a text page is to get artistic. By that I mean think outside of the box in term of interpretation of the text and idea of the story. One of the subjects my son had to write about in the book was about "accepting the different". My son chose to write about Autistic people and how they can be integrated in society. So for this page I created a tare in the paper that is combined together with a string, two parts integrated. An abstract expression of an idea. 


That concludes this series...
If by now you have not started your own heritage book or at least created a few family pages I'm sure your fingers are itchy and you are just waiting for the weekend when you'll have more time :)
Please share your pages with me...

I hope you liked this series and if you did please let me know in a comment.

Don't miss out! Keep up with all the crafty goodness by subscribing to the Einat Kessler creative newsletter

Have fun creating!

Tuesday, June 16, 2015

Father's Day Roundup

Father's Day is just around the corner so I've found a few cool ideas for gifts and cards to make all of your daddies happy!


For this gift you only need two things: a large mug and a black Sharpie pen. Write whatever you want on a mug and you have a personalized useful gift. You know your dad the best so you can come up with just the right think to write: a quote, something funny or even draw if you know how.


This is a great idea even for those dads who don't where ties. I also like this idea because it can be personalized according to whatever your dadlikes. You can put anything inside the goodie bag!
Here's how to create it.

Continuing with the tie theme her's a really cute idea for a card.


Here's a card I created using sand paper of different rades and some nails. You can find a full tutorial here.


A yummy present with your father's favorite drink and snack! Here's how it's done!


This is an amazing card! There are no instructions on the website but there are a few close up photos that might be useful if you want to try and create one. Here's the link

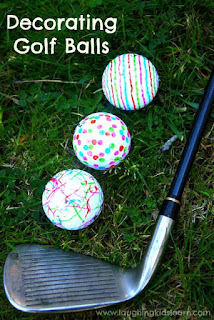
For those f you who are looking for a funny gift here's a crazy idea...embellish your father's golf balls. That'll make him the most unique golfer in the club!


Don't miss out! Keep up with all the crafty goodness by subscribing to the Einat Kessler creative newsletter

Have fun creating!


Sunday, June 14, 2015

Art Journal Page: Don't make me walk

You've heard me say this before but I'll say it again: Art Journaling is for EVERYBODY! You don't have to be an artist or know how to draw to create beautiful pages. This page is so easy to make you'll be amazed! The secret is the applying technique of the acrylic paints.


Creating texture on an art journal page does not always require adding 3D supplies or materials. You can add texture simply by Applying the material you have in a different way. In this page I wanted to create the sky, but I didn't want it to be flat. I wanted it to look like real sky with layers of blues and teals, lights and shadows. The way to do that was to use a few shades of blues and teals and apply them in a circular motion, creating movement and texture.


To complete the sky I added white clouds with my finger and a little white gesso and the glow of the sun using two shades of yellow Gelatos. It turned out so great you can almost hear the gentle wind blowing and see the clouds moving calmly in the big blue.


This page is so striking it's almost hard to believe I only needed acrylic paints, gesso and gelatos to create it. It was fast and easy and there is no reason you shouldn't try. To finish the page I added the quote with Mica flakes covered wings.


Check out the step by step video tutorial to see the applying technique and how to create this page.

Don't miss out! Keep up with all the crafty goodness by subscribing to the Einat Kessler creative newsletter

Have fun creating! 

Friday, June 12, 2015

Making a Family History Book Part 4

Welcome to the fourth post in the series! I hope you you were inspired to start your own family history book or to add some new ideas to the heritage projects you're currently working on.

More Photos space

I've used interactive opening flaps to increase the space for text, but it is also a great solution for more photos space. Create an opening flap with text on both sides and add photos on the part under it. this will also create an element of surprise and discovery to the history book and give the viewer a feeling of exploring and discovering the history themselves.


Interactive mechanisms

I've already explained how interactive mechanisms can increase space for text and photos, but these mechanisms can help you add content to the page. The same way you can use a theme to tell a part of the story you can use an interactive mechanism. In this page I created an opening envelope with a letter inside that is the the story of my grandfather. The envelope is part of the story by conveying the idea of him being away.


Other Forms of Text

The written word is a vast fascinating place that we can draw a lot of inspiration from. One way I presented the text is to arrange it in a form of a newspaper. I thought of a name for the newspaper, which is based on the family name of that side of the family and arranged all the text in columns similar to a news paper. I even gave each little story a headline and added advertisements and photos. Since most of the stories take place more than 60 years ago I found advertisements from that period online and added them for a more authentic look.


Make sure to tune in on Friday for the final part of the "Making a Family History Book" series!

Don't miss out! Keep up with all the crafty goodness by subscribing to the Einat Kessler creative newsletter


Have fun creating! 

Tuesday, June 9, 2015

5 Minutes Craft - Steampunk Magnetic Bookmark

Today in 5 Minutes craft I'm sharing a magnetic bookmark, but not only is it functional and super easy to create it's also in steampunk style! So I'm having fun all around!


Steampunk is one of my favorite styles. I love the dark colors and masculine feeling to it and I also like the mechanical and Si-Fi feel to parts of the imagery. If I can play with cogwheels, wires and other metal embellishments I'm happy! Steampunk is much easier to create than you think. All you need are scraps of paper in dark colors with a pattern like script, numbers, keys,shapes etc. just make sure there are no cute or flowery images. Then you need a metal embellishment that can be a cogwheel, a flower or a key as long as it's metal.


Once you have all the things you need just create the bookmark or even a few of them. The secret to this bookmark is that it's magnetic and can't fall. It holds the book pages between its two sides. Check out the video to see how to create it! Check out the video to see how to create it!

Don't miss out! Keep up with all the crafty goodness by subscribing to the Einat Kessler creative newsletter

Have fun creating!